
Grafting Techniques
Grafting Techniques
The art of grafting has been known since antiquity: numerous testimonies attest to the existence of masters of grafts in almost all historical periods. It goes from the Greek agronomists to the peasants of ancient Rome. In fact, grafting is a practice that has nowadays been almost unchanged: the fundamental principles were already known two thousand years ago.
With this practice man has propagated the best fruits by selecting the best characteristics of each variety.
Grafting from a technical point of view is an agronomic practice for the agaric multiplication of plants made with the anatomy-physiological fusion of two different individuals (bionts), respectively portinct or subject and object or object, of which the former constitutes the basal part of the plant and the second the aerial part. In some cases, grafting is done with three individuals, interposing between the festoon and the one third a blonde, the said intermediary.
However, the grafting consists in welding, on the rootstock, a part of the plant of the so called marza, represented by a branch or a branch, in the latter case said eye or shield. In this way a single plant is formed of two different portions. Histological fusion occurs thanks to the callus that is formed between the two cut surfaces, exactly where the batch merits are combined.
Grafting is commonly used in floriculture, gardening and fruit growing.
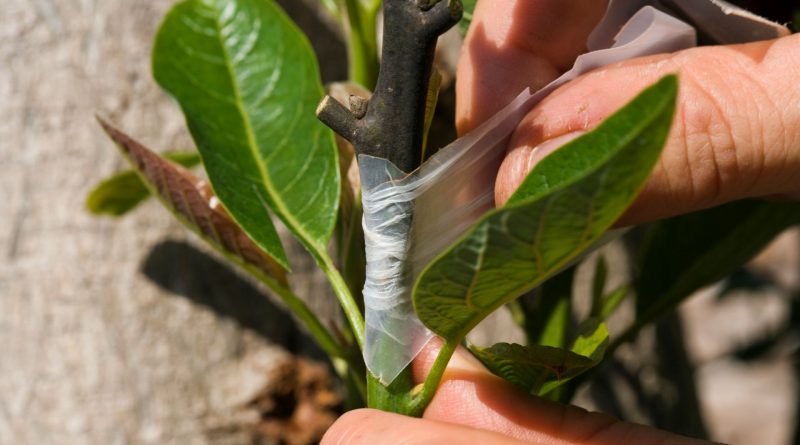
In the grafting technique, however, it is always extremely important that the gearbox (that is, the generally green color layer, which lies beneath the bark of the rod holder) is in close contact with the gear shift.
The motivation for using the rootstock is for those cultivars of fruit or ornamental plants, which, as often happens with roses or many fruit trees, are found to be weak constitutionally due to the gerontological degeneration of the cultivar. Usually the rootstock is of the same kind or at least of the same family as the cultivar you want to reproduce and it will be useful to consider the morphological development analogies that allow to hold similar cultivar and rootstock.
The most important thing to pay close attention to (which then becomes spontaneous with practice) is that the two contact areas that are in contact combine perfectly. In order to ensure a stronger stiffness to the joints, the bindings are almost always indispensable, which are made with the use of mostly raffia limbs. To overcome excessive loss of moisture, or infiltration or stagnation of the water at the point of attachment, or to the attack of the parasites that would find easy seat at the level of the exposed wooden parts, both the cutting sections and the head of the shrubs can be covered by a special mastic: this is however dependent on various factors including climatic ones.

We now see the main types of grafting –
1. T-slot grip
This method is very used to reproduce both roses and other garden shrubs.
The removal of the buds will be performed by the enucleation of the same ones, provided with a bark portion, acting with the help of a sharp sharpener or knife. It will be made to take with a gemstone a small shield of epidermal tissue of 2-3 cm in diameter, deep enough to take also a very slight surface of the underlying wood. The shield will then be immediately inserted, in the dustbin, at ground level or just above it. The periods in which you can do this type of graft are two: as long as the bark breaks easily from the wood, that is when the plant is said to be “in the lymph”. If carried out in the spring, at the beginning of vegetative recovery, the graft is called “vegetative gem”, since the gem of the shield (obtained from branches that will be picked during the winter and kept in a cool place) will immediately enter vegetation ; in this case, when the graft is to be applied, cut the subject immediately above the point of insertion of the shield. If the graft is executed between the end of August and the beginning of September, it will be called “dormant gem”; this is because, in that case, the gem that fits (and will be removed at the time of the operation) will begin to vegetate only in the following spring; in this case, in March, the portion of the garnish over the gem will be cut off. Soon the grafted gem will begin to grow and will give rise to a robust vegetation.
2. Double-sided engagement with tongue or tongue
The double-sided engagement or tongue joint is another method of propagation of ornamental and fruit trees that runs in March-April. For this technique, the recommended containers have been used by planting them in the autumn at least a year earlier and grafting them in the following year in March and April. It is recommended to cut the barrier to 10-15 cm from the ground level; a 4-5 cm long sloping cut is practiced at the top and immediately next to it another one is formed to form a V. The shingle, which must be of the same diameter of the subject, must have a pair of buds and must be prepared by well-developed years. At this point you have to cut the base of the shrub with a 4-5 cm oblique incision and apply another oblique surface cut to the first to get a V similar to the previous one. At this point you have to push the tongue of the marza against that of the rootstock and tie it all firmly with raffia; it is recommended to cover all exposed parts with a special mastic. To ensure that the clamping succeeds, all cuts must be perfectly adherent and must therefore match; this is because the change of the rootstock has to be in close contact with that of the marsh.
3. Wedge wedge
This grafting method is applied to graft the rhododendron cultivars and is performed in the March period, in a heated greenhouse. As rodenticide, Rhododendron ponticum is usually used in 2-3 year old individuals in pots. They will be cut to 2-4 cm height wedge-shaped. From the plant you want to reproduce you will extract a branch of a year, about 10 cm long, with a gem at the top, and it will hit the base so that the cut has the shape of a capped V and so it fits perfectly to the grip. Always make sure that the insertion point is perfectly secured. Then, as with other types of grafting, the raffia bandage and the cover with a special mastic are banded.
4. Bridge engagement
The technique of this graft is useful when the bark of a tree has been damaged. Some sprouts are picked from the same tree to overcome the damaged area and thus ensure the ascension of the lymph to the trunk and branches. The grafting is implemented “under the bark” by connecting both ends of the trunk. It will then bind with raffia and will mock any parts of the graft which are not sufficiently protected by the raffia ligature
5. Approximation or Approach coupling
It is possible that this grafting technique was what our progenitors observed in nature and which has given rise to the refinement of grafting techniques. In fact, in this type of grafting, the marra is joined to the rootstock without removing it from the mother plant; when the graft is grafted, the graft is cut. This method also fits well to hedge plants and shrubs. Generally, the stems are bred in a vase and are currently located near the plants from which the grafts will be removed. From both plants, a small portion of the bark will be discovered by engraving and then make two matching tabs as in the double-engagement graft. The two pieces cut will then be adhered to each other and tied up with raffia
6. Crown hook
This technique is carried out on a barrier rod of at least 15 cm in diameter. It is performed by inserting some bark below the bark on the horizontal cut off. Subsequently, an incision is made between the bark and the wood at the point where the binder has been cut; at this point insert the marzes so that the wood of these and that of the plant come into contact. As usual, it will tie the graft with raffia, protecting it with mastic. This graft can be used for all fruit plants and it is necessary that the stems are not too long: 2-3 gems at most, always remembering to expose the apical outline
7. Split splint
The split graft is obtained through the cuts at the base of the spikes like a pointed pencil and slightly square. The stem or branch that is to receive the graft will then be cut diametrically, spreading the two edges of the cut, possibly with a wedge and inserting the two stems, each at the two extremes of the cut. It is necessary to make sure that the gearbox on one of the two parts of the sprouts is always in contact with the gear change. The graft must be coated with a mastic after having firmly bound it with raffia.
Guido Bissanti